Monday, August 30, 2010

Purple Pearl


Recently, a good friend of mine came back from Korea and was nice enough to pick me up some nail polish~ He chose some Korean brands that I have never tried. Here is the first one- this is called deco Olive 528 섹시바이올렛. It is a pretty pearly purple with a hint of pink. It took 3 coats to be opaque. The application was not bad, as the handling of the brush was pretty problem-free. However, it was quite streaky and after 3 coats, you can still see streaks o_0.The smell of this nail polish reminds me of something...but I can't put my finger on it at the moment (EDIT: reminds me of the silver/gold liquid pens that you have to shake before use!). All in all, this is quite a nice color, and I can see myself using it to do some nail art. That's all for today! Thanks for reading :)
Pin It Now!

Friday, August 27, 2010

Pink Gradient

Here is a sneak preview of the upcoming gradient tutorial! Enjoy the pictures!


Pin It Now!

Tuesday, August 24, 2010

Gaga for you


This is my entry for this week's challenge by PolishHoarderDisorder. The criteria was to translate a song onto your nails and there were many great entries!

I had fun making this manicure, although I had to sift through my nail polishes for the right gold color that I wanted. For the gold base manicures, first paint on a gold base until opaque, then use a paint brush and design leopard spots on top. You can also use a Konad plate if you choose, but the color will not be as intense. Next, line the top and bottom of the nail with a black striping polish. For the other fingers, paint a base of black polish. Next, choose a blueish-green and paint 3 quarters of the nail leaving a quarter of the bottom nail black. I used 2 coats. Apply jewels if wanted :)

The nail polishes I used:
Gold: The Body Shop Golden Winter Sun (Christmas limited edition from a couple years back)
Black: OPI Black Oynx
ArtClub Striping Black Hologram
Blueish-Green: MAC Morning.After

Thanks for reading!
Pin It Now!

Saturday, August 21, 2010

Grape Juice


This awesome sparkly purple is from the China Glaze Summer Days collection of 2009. I've have heard and seen rave reviews of their whole collection, so when I put an order in on
Head2toe, I knew I had to grab a couple from this collection.

Grape Juice should not be confused with China Glaze Grape Pop, although the name is quite similar. Grape Juice is a beautiful mid-purple color that I absolutely adore. The application for this polish was very smooth and it was opaque in 3 thin coats. This color looks great both indoor and in the sun and I just can't seem to get enough of it. The wear on this is good as well, I had it on for 5 days, and aside from natural nail growth, there is hardly any chipping at all.

I have no dupes of this purple in my whole collection and I have quite a few purples (which I only realized after my friend asked to see my purple nail polish collection). For those of you that have tried a polish from this collection, which one is your favorite? Does Grape Juice top the list?

Thanks for dropping by~
Pin It Now!

Thursday, August 19, 2010

Handpicked for me


This is the first mini Sephora by OPI polish that I've tried and swatched. It is a very pretty lilac pink color that I really like. This is called Handpicked for Me and it's from their modern flower collection that was released this spring. I bought the mini set which includes 3 other colors because I wanted to try them all out and separately they retail for $9 each.

The application on this was a little harder than usual due to the fact that the brush is a lot smaller. I think this is avoided when you buy the full size product. The polish was not as pigmented as I thought it would be, and it took 4 coats to achieve no VNL. Also, I found that you had to leave as little more time in between coats for the polish to dry and I smudged my thumb in the picture while I was trying to take a picture, even though I left ample time in between. Otherwise, the application was smooth and the color is gorgeous.

I am holding a new dress I bought on ASOS. They are an online fashion store based in the UK. They are having a massive sale on many clothing items right now, so go on and take a look! BEWARE: sizing is a bit different in the UK, so be careful. Another cool feature is you can view the clothing item use choose by clicking on "view catwalk" and a model will model that item for you so you can see how it looks on!

That's all for today :) Happy polishing and shopping to y'all ~ thanks for dropping by.
Pin It Now!

Tuesday, August 17, 2010

Greens

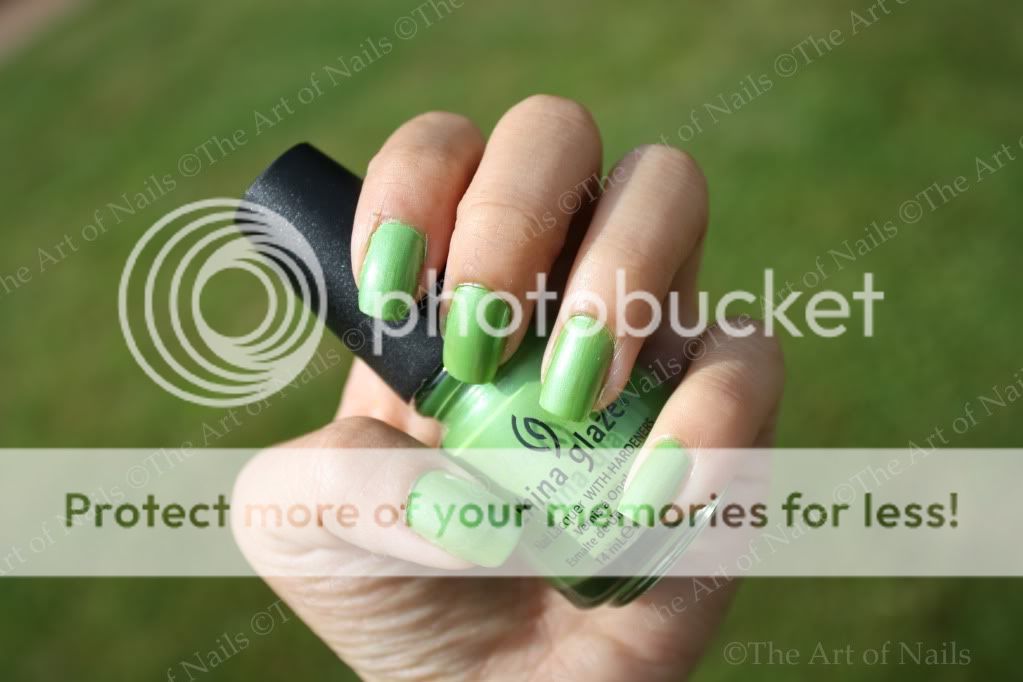
China Glaze Tree Hugger


China Glaze He's Going in Circles


Here are some swatches of some green nail polishes that I recently bought.

China Glaze Tree hugger is from their 2008 ecollection that focused on a earth conscious theme. It had pretty smooth application and applied nicely. I am wearing 3 coats with no top coat and you can really see the intensity of this green. Doesn't this look great in the sun?

China Glaze He's going in circles is part of their Kaleidoscope collection that is hardly sold in stores now which is a shame. I have had lemmings for all their colors, but this is the only one I've found so far. I'm not going to lie, but the first coat of this polish was SO translucent that I was disappointed. I could only wish that it would have more pigment as I added more coats. Fortunately, after 4 thin coats, the holographic effect that you see above began to show and become opaque. The application was smooth and the texture is very smooth as well. The only complaint I have is the number of coats needed to achieve opacity and how hard it is to capture the true color. It looks sort of silvery right now in the light, but this was the best picture that was closest to the color - just imagine it a bit more green.

That's all for today :) Thanks for reading ~ What are YOUR favorite greens?
Pin It Now!

Saturday, August 14, 2010

Funky Tips


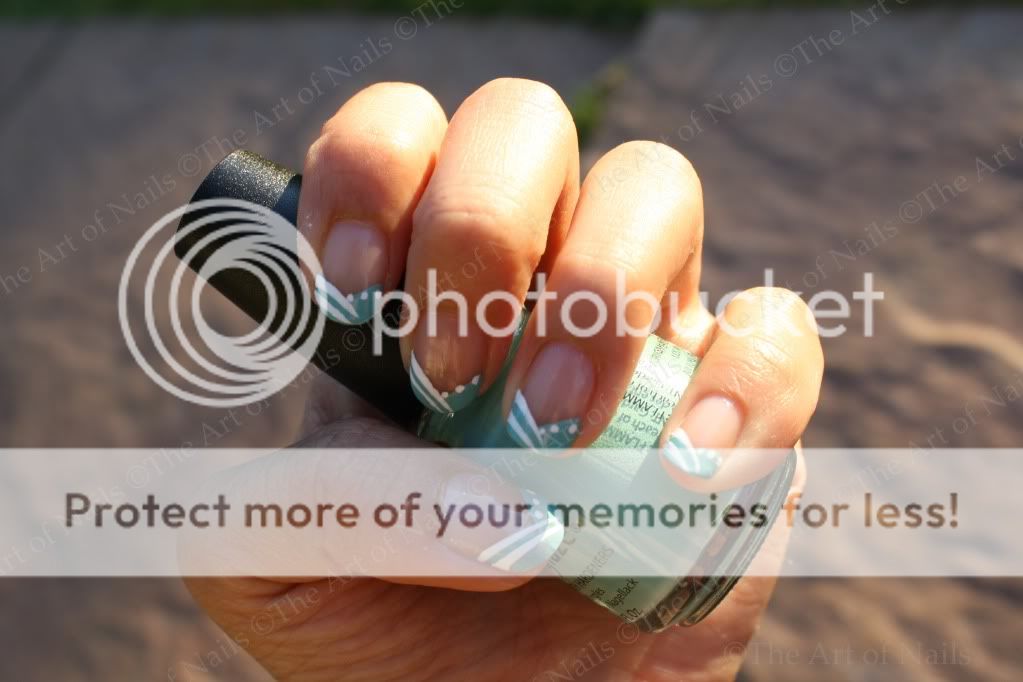
Here are the tips that I submitted for this week's challenge at Polish Hoarder Disorder. I think just doing tips is such a fun way to accentuate your nails, and it allows some of your nail to get some oxygen and breathe! There are just so many designs out there for tips and I've seen some pretty amazing ones in magazines and on YouTube. These two are my version of the design that I've seen on others and there are still so many I want to try.

For my "minnie mouse" manicure I used ESSIE Really Red for the tips, OPI Alpine Snow for the dots, silver striping polish, and star stickers for my thumb with a coat of top coat.

For the other manicure I used China Glaze For Audrey, white striping polish, and CND Super Shiney Top Coat (i was so excited when I got this, it's amazing)

Thanks for stopping by!

PS- If you noticed that my nail shape has changed it is because I decided to trim down my nails for it to grow again and let my natural nails breathe for a couple of days - hopefully it'll grow fast!
Pin It Now!

Friday, August 13, 2010

Marbling Tutorial
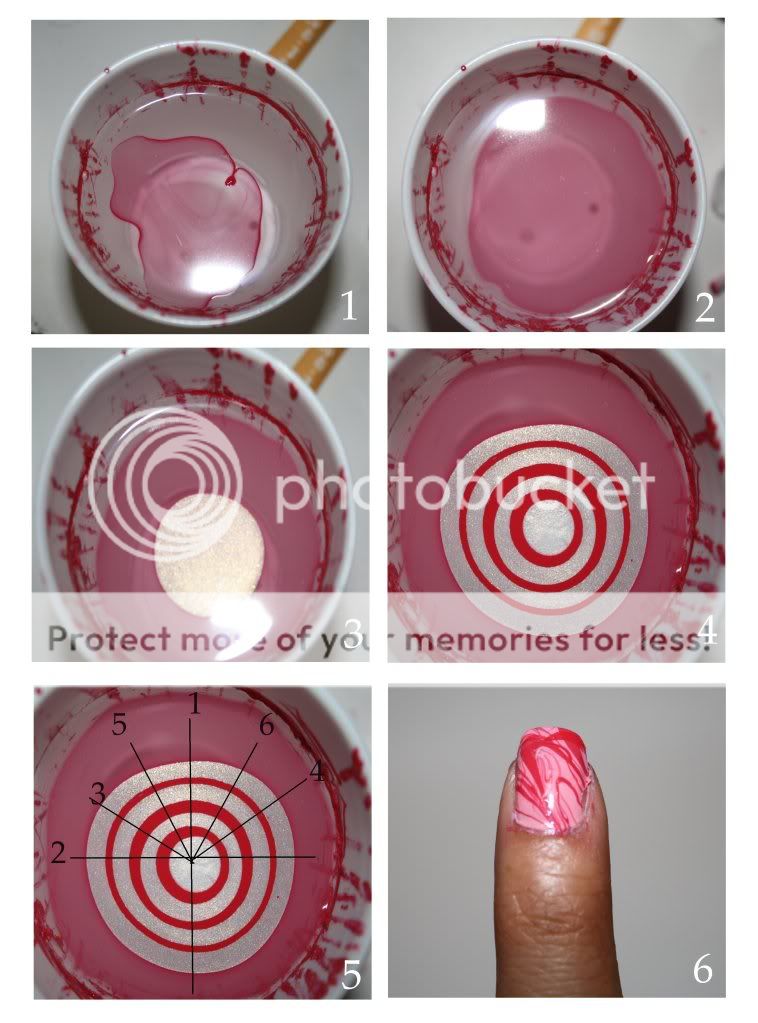


Here is my first tutorial on how to do water marbling on your nails, enjoy!

Prep: a cup or container filled with warm distilled water

Before you start, paint your fingers with a base color of your choice. Next, choose 2 (or more if you want) other nail colors that compliment your base color and each other. Lastly, have a bunch of toothpicks/orange sticks on hand and also cuticle oil/scotch tape. Finally, you are ready to start!

1) Test out if the nail colors you have chosen “float” on top of the water, it should spread out like the picture (most OPI nail polishes do). Then paint around the nail you are going to dip with cuticle oil or cover it with scotch tape for easy clean up.

2) Now you are ready to form your rings- make sure the caps on your polishes are loose as you have to do the following steps quickly. Start with one color and let a droplet fall close to the top of the water

3) Next, using you other color, let the droplet fall in the centre of the first circle (the bullseye of the circle)

4) Continue building your rings until you have at least 8, alternating colors every time

5) Using your orange stick/toothpick, follow the numbered lines and drag the polish from top to bottom or left to right

6) Find a design that you want on your nail, and gently, with the nail facing downwards, dip your nail in at a slight angle, pull it out and now the design is on your nail! Congratulations, now you are done 1 nail. Repeat steps 1-6 for the rest of your nails.

Tips:

After each nail, twirl your toothpick/orange stick around the edge of your cup to pick up the rest of the nail polish and wipe it off on a paper towel.

If floaty-bits are beginning to surface, let a droplet of nail polish fall, pull it out to the sides of the cup with your toothpick, and wait for a minute. Then twirl your toothpick to pick up the layer of nail polish, and voilà, your surface is clean again.

For my manicure, I used Essie mini how high as my base, and OPI She's Golden and JOE Fresh Berry for my marbling.

You can see the finish manicure here. Hope this helps, feel free to ask me any questions! Thanks for reading :)

Pin It Now!

Tuesday, August 10, 2010

She's a dream


Indoor photo


Outdoor photo - cloudy

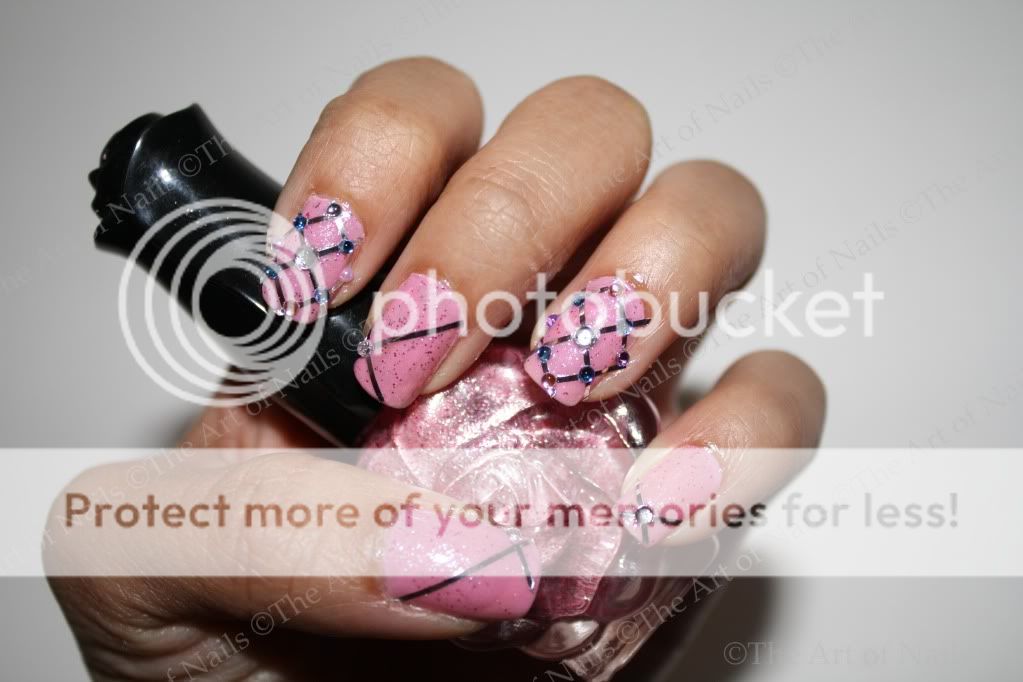
I already had on the manicure from the wedding and I really liked the color so I decided to do something fun with it. This nail design was inspired by the song She's a Dream by the Backstreet Boys (click to listen). I went to the concert this weekend and it was absolutely fantastic. This was my first striping nail design and I'm quite happy with how it turned out. I criss-crossed the ribbon and put jewels on the intersections.

Some tips if you are thinking of using striping ribbon:
1) Leave a little bit of extra ribbon on each end before you trim it, this will help it stick on better
2) Remember to cut the ribbon as close to the nail as possible when you are trimming to avoid the ends from lifting up.
3) Use 2 coats of top coat
4) Add jewels/nail stickers in between the two top coats if needed

Hope you enjoyed the design! Leave a comment to tell me if using striping ribbon is something you would try :) Thanks for reading~
Pin It Now!

Sunday, August 8, 2010

Wedding Deco

Weddings are so wonderful. To be able to find the one you love and want to share the rest of your life with is pretty amazing. Over the weekend, my friends got married and I was in charge of decorations and the nails. Here are some pictures of the wedding decorations and manicures!


Maid of Honor's Manicure


Close up of French Manicure


My own nails and corsage for the wedding.
Base: OPI Got a Date To-Knight, Top: Anna Sui 307
Pin It Now!

Thursday, August 5, 2010

Pink Water Marbling


Here is a quick sneak preview of my pink water marbling! I tried out different designs, but I think I like the thumb best. I will post up a tutorial soon~ But for now, enjoy the picture!
Pin It Now!

Tuesday, August 3, 2010

DS Reserve


I love holographic nail polishes~ They are so pretty and kawaii *heart*

DS Reserve is a gorgeous holographic pink polish and the application is phenomenal. I don't say this often, but it truly was. It glided on so smoothly and the first coat was already super smooth. In the picture I'm wearing two coats and it's opaque already. I'm not wearing a top coat because I don't want to diminish the effect but it still feels uber smooth on top. Can you tell that I'm in love with this polish?

Although the price tag is a bit hefty ($12.50 US), I think it's worth it if you haven't invested in a pretty pink holographic nail polish (or even if you have but want it!). I would definitely recommend this lovely color.

What are you favorite holos? Thanks for reading!
Pin It Now!

Monday, August 2, 2010

Polish Haul


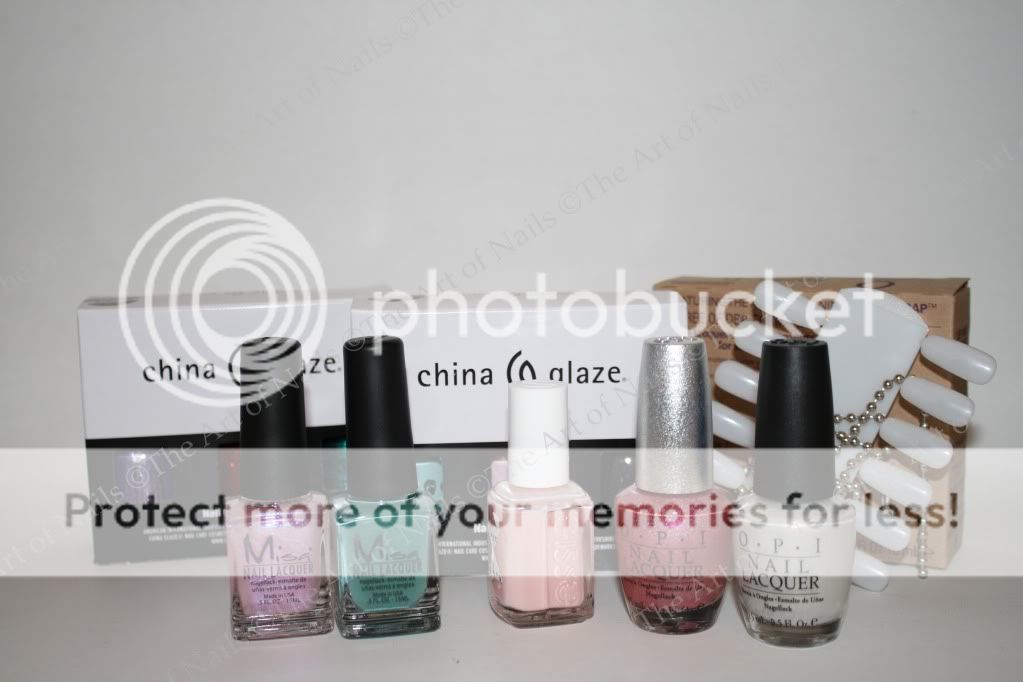
Just a quick post - I'm so excited! Here is a picture of my mini-haul of polishes I picked up today! It is a preview of all the swatches/designs that are to come later. I didn't take all the China Glaze and Orly polishes out of the box, so you can guess from the picture what colors I chose ;)

Hope you are all having a wonderful day. Thanks for reading!
Pin It Now!

Sunday, August 1, 2010

Pink Batch 1

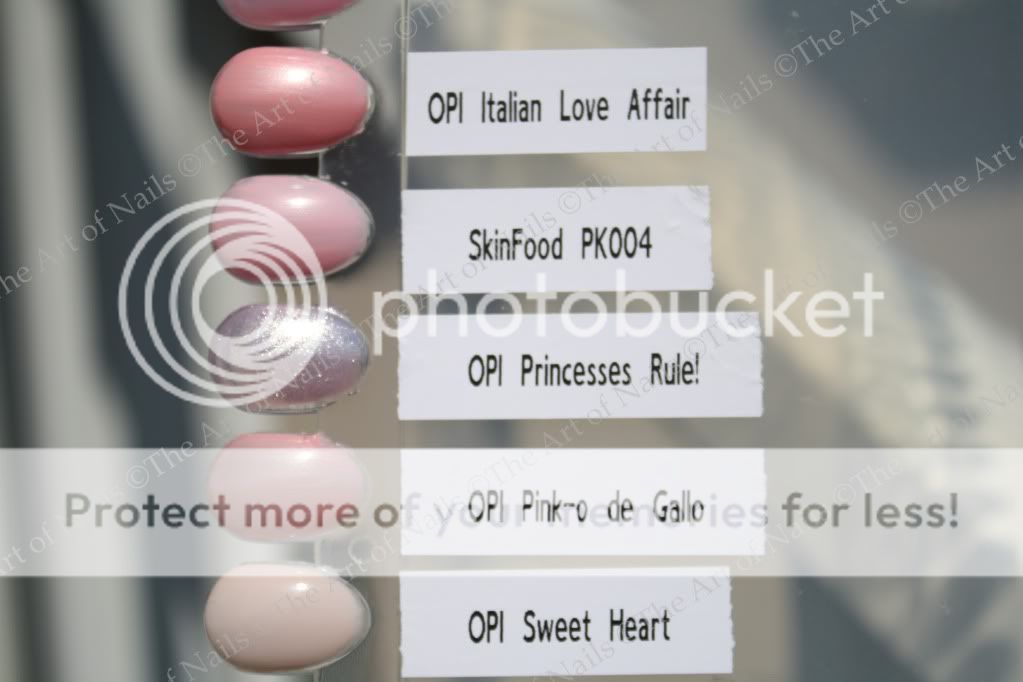
With so many weddings coming up and the pink nail polishes I have, I've decided to show you a couple each time. I have recently starting swatching my nail polishes on nail boards, and labelling them. I tried to capture the color as accurately as possible, but forgive me if there are some discrepancies. Okay, here is the first batch!


And here is what it looks like in the bottles:


From left to right: OPI Italian Love Affair, SkinFood PK004, OPI Pink-O De Gallo, OPI Princesses Rule!, OPI Got a Date To-Knight! (not swatched above, will be part of the next batch)

That's all for today! Have a nice long weekend if you are in BC :) Thanks for dropping by.
Pin It Now!