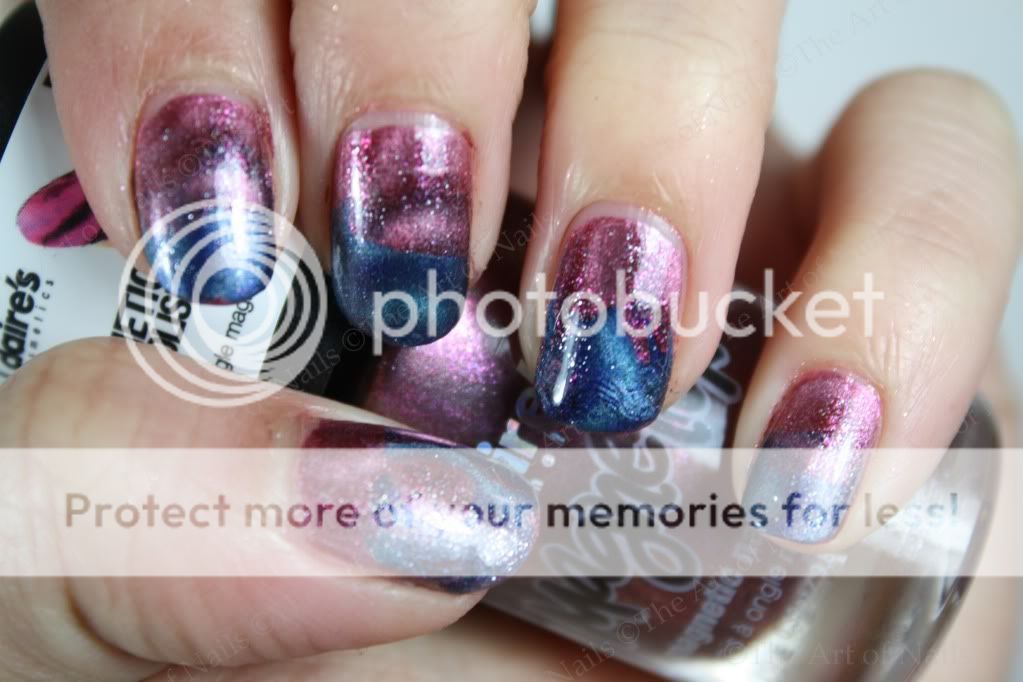
Monday, January 30, 2012

Magnetized Pink


Here are 2 coats of Claire's dark pink magnetic polish with the wavy magnet. You can probably get by with one coat, but I thought 2 would look better. The magnet cap is very similar to nails inc. magnet cap but this one has 2 cuticle ledges in a shape of a V. This was really easy to use and the formulation of this polish is great. I love this color! Some of the brushes are kind of crappy on these polishes because they clump, so if you are allowed to check the brush before you purchase it, remember to do so!
Don't forget to enter the giveaway here!
Pin It Now!

Saturday, January 28, 2012

Magnetic Gradient Friday


I bought two new magnetic polishes today at Claire's. I decided to try if they would blend together well in a gradient. My thought was that since you have to put the magnet on each finger right away for the design to show, it might meld the two colors together. I used a shimmery pink and a shimmery purplish blue polish for this magnetic mani. These polishes do not have names. I did a wet gradient and put the magnet immediately on top. It is supposed to be a wavy design but the colors didn blend together as well as I wanted it to. I put a coat of Orly Twilight, a sparkly bluish silver shimmer top coat, in hopes of blending it more together. Still not what I was hoping. I might attempt this again because I really think in theory it should work. Hope you enjoyed this anyways!
Don't forget to enter the giveaway here
Pin It Now!

Thursday, January 26, 2012

How About a Tumble

This gorgeous gorgeous holographic pink polish is another one of my lemmings. I bought this a little while back from a fellow blogger. China Glaze How About a Tumble is a 3 coater and applied very nicely. I attached more pictures than usual because it is so mesmerizing. If you ever see this or any polishes from this line anywhere, PICK IT UP. I promise you it's worth it!
Pin It Now!

Monday, January 23, 2012

Prosperous Year


Orly Emberstone–2 coats / China Glaze Midnight Kiss / Orly Shining Star–gold flakes
Wishing all my dear readers a happy Chinese New Year! May this year be full of cheer and happy moments. Click here to enter the giveaway! 
Pin It Now!

Friday, January 20, 2012

Gradient Friday : Metallic


For today's gradient Friday, I decided to do a metallic gradient using my Juicy Couture by Deborah Lippman nail polish set. The 3 colors in this set are so pretty and work well together so I hope you enjoy! I started off with 2 coats of Believe, a shimmery gold-beige color, which applies nicely but would look nicer in 3 coats. Next, I used Jewel in the crown, a shimmery pewter polish, and sponged it on half my nail focusing more heavily near the tips. Finally, Here comes the Queen, a clear based polish with gold glitter, was sponged on at the tips. I wanted to add a little more sparkle so I added a layer of Orly Shining Star, which is a gold iridescent top coat.
Remember to enter the giveaway here and have a great Friday. 
Pin It Now!

Thursday, January 19, 2012

Beads and Dots

It's been awhile since I have done an elaborate design on my nails, so since I had a bit of extra time this weekend, I decided to do one. I started off with 2 coats of China Glaze Go Go Pink. This polish is a creamy baby pink polish that applied pretty smoothly. It is a little bit streaky so you have to be careful when applying. Next, I painted my tips using Nails Inc. Devonshire Row (a vibrant lilac) and Finger Paints Winter Sky (a shimmery turquoise). After this dried, I lined it with the corresponding color bead from my Martha Stewart set, last used here. I finished this look off with some random dots applied with a dotting tool using OPI Alpine Snow. I sealed it off with a coat of Seche Vite and it has lasted 3 days already with little damage. If you haven't entered the Konad Giveaway, be sure to fill out the form here!
Pin It Now!

Tuesday, January 17, 2012

Giveaway Time!

As promised, today's will be a giveaway post! The nice people over at Nail Polish Canada contacted me to host a sponsored giveaway to one lucky reader of my blog! Nail Polish Canada carries a lot of different brands that are hard to find in store, so be sure to check them out. I have been eying some polishes from the Soulstice Spa line. The winner of this giveaway will receive a Konad Starter Kit which includes 2 image plates, 3 special stamping polishes, and the stamp and scraper. Here's how to enter:
To enter you must be a follower via Goggle Friend Connect. New followers are always welcomed but your account must be more than a month old. Giveaway will end on Feb 10th, 2012. This giveaway is open to readers from Canada and the USA. There are 2 ways to get an extra entry in: one by blogging/reblogging/sideblogging about this giveaway and another entry by following me via Twitter/Tumblr/Facebook.
As an added bonus, the winner will automatically be entered to win $200 worth of Konad products and if you click here and tell me what your favourite plate is (by leaving a comment), Nail Polish Canada will throw that into your prize as well if you win!
Hope you enjoy this giveaway and don’t forget to fill out the form. 


Pin It Now!

Monday, January 16, 2012

Let it Shine Shine Shine...


During my winter break, I was lucky enough to track down a polish I was hunting for literally a month. Essie Shine of the times, from their Luxeffects collection, an awesome multicoloured flakie topcoat polish. The prettiness is hard to capture on camera. I will use this again soon when it is sunny here! I layered this on top of Finger Paints Haute Taupe, which I also picked up on my trip. Haute Taupe is a pretty cream taupe color that reminded me a lot of You don't know Jacques!. The application was smooth and it took 2 coats to be opaque. I am looking at Shine of the Times again on my fingers and the pictures really don't do this polish justice. I will layer this over another polish soon. Thanks for reading!
Pin It Now!

Saturday, January 14, 2012

Hidden Targets


I have so many nail stamping plates that I never have time to try all the designs out. Therefore, my goal is to try and blog one stamping design at least once every 2 weeks. Todays design used SinfulColors Last Chance, a deep forest green polish, as the base coat. The formula was a bit runny, but it seems to be the verdict for many of their polishes. The color is quite pretty and I used 3 coats to reach opacity. Next, I stamped target dots from BM-206 on using SinfulColors Out of This World, which is a shimmery silver color. I was afraid that it would be too sheer to stamp but it turned out well. You can clearly see the design and the subtleness of this makes it easier to wear. I sealed this mani off with a coat of SecheVite. Exciting giveaway coming soon, so stay tuned!


Polishes were sent to me for review. All opinions are my own. 
Pin It Now!

Friday, January 13, 2012

Gradient Friday

This gradient Friday color combination was suggested by one of my lovely readers. I used SinfulColors Midnight Blue, a shimmery cobalt blue, as my base color. This polish was surprisingly opaque albeit a bit watery. I used one coat of this. Next, I used SinfulColors Daddy`s Girl, a shimmery deep violet with fuchsia glitter, and applied this to the top half of my nail. This polish was quite sheer and watery, which was a bit disappointing because the color looked gorgeous in the bottle. I used 2 coats of this. I mixed a little bit of each SinfulColors polish and used a small paintbrush to blend in the line where the two polishes meet. I applied Claires Dazzling, a clear based glittery fuchsia polish on the tips, to finish the look. I sealed the final gradient design off with a coat of Seche Vite. Have a great weekend my awesome readers!

SinfulColors polishes were sent to me for review. All opinions are my own. 
Pin It Now!

Thursday, January 12, 2012

Polished Style : Chevron

It has been awhile, with the holidays and all, but without further ado here is week 2 of Polished Style. Today's feature pairs funky runway chevron nails with an everyday outfit to make it very wearable and chic. Jen does a great job of pairing colors, textures, and patterns with this nail design, so be sure to check out more fashion pictures here. We used a classic navy and white color scheme for this nail design and chose to do both a single chevron design and a layered double chevron design. Look below for a tutorial on how you can create the layered double chevron look yourself at home!
Materials (from left to right) : Dr.'s Remedy Noble Navy / OPI Alpine Snow / Seche Vite Top Coat / Scotch Tape / Zigzag craft scissors

Prep: Start by painting on your choice of base coat.


1. Paint your nails with your base color. I used one coat of Drs Remedy Noble Navy.
2. Peel off a piece of tape and cut along the edge using your zigzag scissor. Stick on your palm before applying it to your nail. Be sure to press down on the edges. Paint contrasting color on top. I used OPI Alpine Snow.
3. Pull tape away from you immediately after applying the polish. The polish MUST still be wet in order for you to get a clean edge. Paint over with a coat of Seche Vite (Very important, otherwise drying time will be long).
4. Repeat step 2 once polish is dry. Use your base color this time. Remember to pull tape off immediately.
5. You now have 3 layers. Apply another coat of Seche Vite. You can stop here if you wish. Otherwise, onto step 6!
6. Repeat step 2 one last time. Don't forget to stick the tape on your palm before adhering to your nail. Finish off with a coat of Seche Vite. Your design is done!


For more pictures of the outfit worn with this manicure, click here. To see week 1, click here! Thanks again for reading. I hope you enjoyed this. 
Pin It Now!

Monday, January 9, 2012

Tickle My Triangle

This has got to be one of the most gorgeous pink holos I own. I could stare at it all day. China Glaze Tickle my Triangle is a gorgeous medium pink holographic polish. It applies super smoothly and was opaque in 2 coats. Although this is already discontinued, many bloggers are selling them and you can also find it on ebay. If neither option suits you and your lemming for it is high, try dusty hunting! You will be surprised at what you can find sometimes. Thanks for reading. I am going back to staring at my fingers.
Pin It Now!

Friday, January 6, 2012

Gradient Friday : Ettusais

I wanted to try a gradient that is not usually in my color scheme this week. Yellow and green seem to blend well together and they are 2 new colors that a friend recently gave me so I thought this would be a good opportunity to use them. I first painted 2 coats of Essie Moonstruck as my base. This polish would probably reach opacity in 3 coats but I thought 2 would suffice for my gradient. Next, while the base polish is still tacky, I painted Ettusais 9, a sheer yellow sparkly polish, on the top 2/3 of my nail. Next, while it was still a bit wet, I painted Ettusais 15, a less sheer sparkly green with silver hexagon flakes, near the tips of my nails. I repeated step 2 and 3 once more to really blend in the gradient. Remember to use thin coats so it does not get too thick!
In the second picture, I painted Ettusais 10, a sparkly bronze, near the cuticles to make the white less harsh. Which look do you prefer? Are there any color combinations you would like to see for next week? Let me know! You can find out more about Ettusais here.
Pin It Now!

Tuesday, January 3, 2012

WhiteHall

I was recently in Sephora again (surprise, surprise) and spotted this green beauty. Nails inc. Whitehall is a greenish-teal magnetic polish. The color was perfect for the holidays and is easy to match with any outfit seeing as it is a darker color. This polish applied smoothly and there were no problems with application. As with all magnetic polishes, you apply one coat first and let it dry. Next, you paint on a second coat, one finger at a time, and immediately place the magnet over it to make a design. I held my magnet sideways this time for a different pattern as compared to this one. I really like these magnetic polishes and I wish they had more colors! What do you think about magnetic polishes?
Pin It Now!